
Last week, I introduced you to the importance of capture and how it relates specifically to the GTD methodology (although the concept of quick capture is really universal and can be applied to any productivity system you choose to employ, including the Agile Results) methodology we’ve blogged about before. In this post, I want to show you how to quick capture on your Mac using a great little program called “nvALT”.
You can watch the screencast which has step-by-step instruction on how to set up nvALT or you can read along with the text underneath the screencast.
For a long time, not knowing where to quick capture on my Mac was a big hole in my productivity system because I’m on my Mac almost all day, every day. For awhile, I thought that since I was already at my computer I didn’t need to to have a quick capture inbox since every place I may decide to put this information is already accessible from my Mac.
What I discovered though is that while the actual process of taking my information and putting into OmniFocus or Evernote or other appropriate application doesn’t take more than a few seconds, making the initial decisions about where things should go required significantly more effort. When the phone is ringing and clients are clamoring for your attention, it’s easy to just not do anything with that information if you can’t make that split-second decision about where it should go. I realized that if I wasn’t 100% sure where I should put something, I ended up not putting it anywhere. As my day got increasingly more busy and hectic, my threshold for decision-making kept getting lower and more and more I found things slipping through the cracks.
Enter nvALT.
nvALT is a lightweight program for capturing created by Brett Terpstra. You can get it for free from his website. There are 3 very important things that nvALT is very good at:
- Quick access to data-entry
- Markdown support
- Lightning-fast search
These 3 key features make nvALT a very adaptable part of ANY workflow.
When you first launch nvALT, it looks like this:
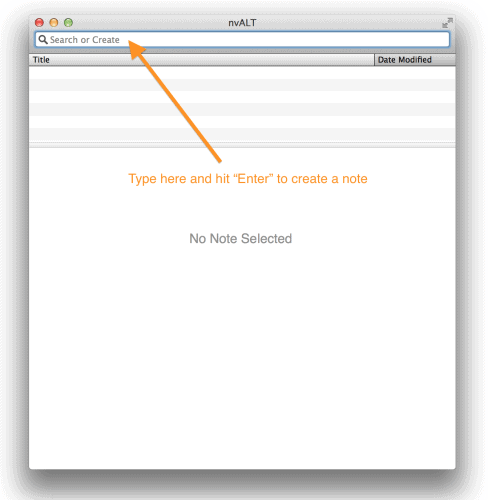
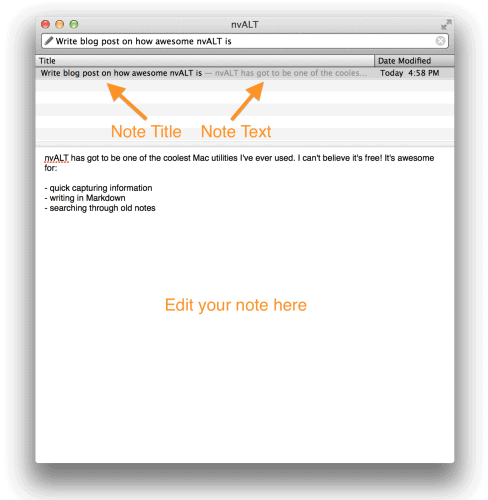
Just a blank slate, ready to capture. To create a new note, start typing your note title into the “Search” bar and hit “Enter” to create a new note file. This will create a new note with the title and take you down to the “Editor” pane where you can continue to type and flesh out your note.
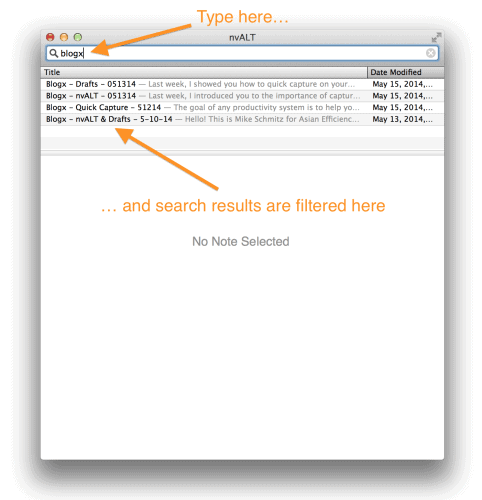
Once you have notes entered into nvALT, you can also find them quickly using the powerful search feature. To search, just start typing in the “Search” field and you’ll see nvALT will instantly return search results. nvALT will search both titles and the contents of your notes, and it’s lightning-fast – the fastest search I’ve ever seen.
This search capability is very important for our GTD workflow. Once you find what you’re looking for, you can clarify that information (process what it means) and organize it (put it where it belongs), steps 2 and 3 in the GTD methodology we discussed last week:
- Capture – collect what has your attention
- Clarify – process what it means
- Organize – put it where it belongs
- Reflect – review frequently
- Engage – simply do
That is nvALT in a nutshell – it’s very fast and very simple, making it the perfect quick capture tool for Mac. I do want to show you how to make a couple tweaks to nvALT though that can make it even more powerful and easier to use.
Tweak #1: Establish a Hotkey
A “hotkey” is a keyboard combination you can use to open nvALT without using your mouse – it opens ready to capture. I use another piece of Brett Terpstra trickery to remap my Caps Lock key so that instead of turning on Caps Lock (which I never use) it simulate a key press of Shift + Control + Option + Command. The reason I do this is because I can now use my Caps Lock key to make simple keyboard shortcuts (like Caps Lock + N, which is really Shift + Control + Option + Command + N) that aren’t duplicated by anything else in my system.
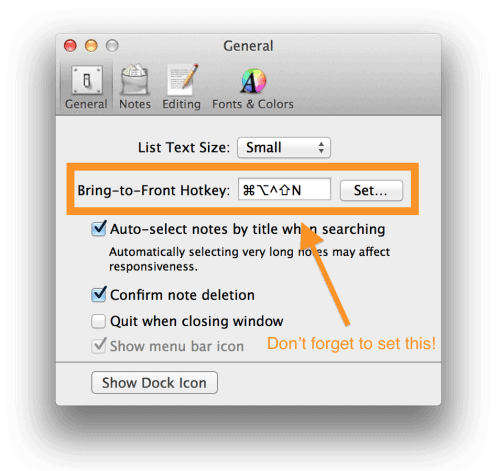
You don’t have to go crazy like I did, but you do need a hotkey combination that opens up nvALT to so you can quick capture information easily.
Tweak #2: Set up Sync
By syncing your nvALT notes via Dropbox, you can make them accessible to other programs. The more you can streamline your workflow like this, the better – then you don’t have to worry about where you put what. I store my nvALT notes in a Dropbox folder called “Notes” and I access that same folder using an app called “Notesy” for iOS. This is useful for when I quick capture information that I want to flesh out later, like an idea for a blog post. I can quick capture the blog idea into nvALT, then if I’m inspired on the go I can add to the note using Notesy on my iPhone or iPad.
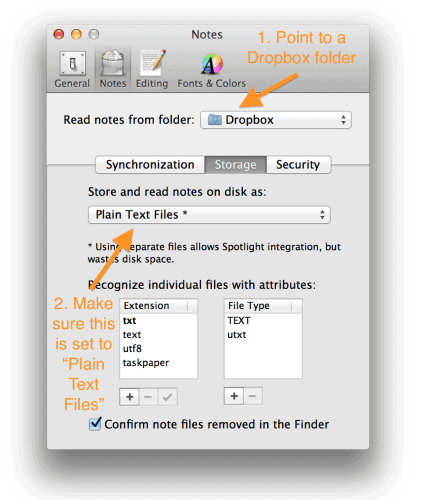
To sync, you also need to make sure you set change “Store and read notes on disk as” from “Single Database” to “Plain Text Files”.
Tweak #3: Use an External Editor
nvALT is great for quick capturing bits of information, but it’s not great for doing long-form writing or editing (even though it does support Markdown). Fortunately, it’s very easy to switch from editing in nvALT to editing in your favorite text editor. I happen to like Byword because it has beautiful typography, great Markdown support, sync via Dropbox or iCloud is rock solid, and it allows you to publish straight from the app (in-app purchase required).
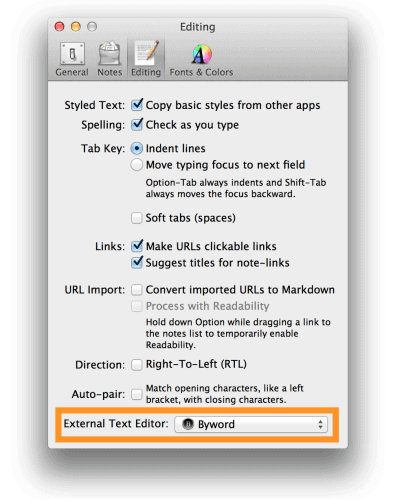
Once you select which program you want to use as your external editor, just select the note in nvALT you want to edit and hit Shift + Command + E. This will open the note in your external text editor, and if you’re syncing your files via Dropbox all your changes will be synced when you save the file.
So that’s how I use nvALT on my Mac. Next week I’ll show you how to use a great iOS utility called Drafts to quick capture on the go, and in Part 4 I’ll show you how to set up nvALT and Drafts so you can quick capture on iOS and get those notes into nvALT on your Mac.

Hi Mike,
Great post.
You can create quick notes with Evernote and do a quick search with global commands.
what are the benefits of using nvalt over Evernote? should i keep using evernote as capturing tool?
I’m curious as to the advantage of this over the quick capture capability already built in to Omnifocus. Ctrl+Option+Spacebar brings up the quick entry box and I can capture stuff directly into my Omnifocus inbox. I’m wondering if this isn’t adding another product/layer to the process that isn’t needed.
Hi Jason,
In my experience, I tend to capture things that aren’t always tasks. I’ve found it easier to quick capture this non-task information into a universal inbox and then decide where it goes from there. If I know it’s a task, I’ll put it straight to OmniFocus, but if it’s anything else it pretty much always goes into nvALT first.
For example, in a business setting if you were talking to a client on the phone, you don’t want to be jumping back and forth between applications instead of focusing on the conversation. In my experience, the easiest thing to do is to capture all notes into nvALT and process it all later. Some of it may go to OmniFocus as follow-up tasks, some of it may go to Evernote as reference material (a proposal or contract), some of it may go into a CMS or Contacts app (updated contact information).
I’m actually all for simplifying and eliminating unnecessary layers, but in my experience nvALT eliminates the “friction” from making judgment decisions on information when capturing and that more than justifies it’s place in my workflow.
Mike,
thanks for the post, although I will continue using OF2 and Drafts as my Inbox one of the statements you made during the video made me research: how do I change the function of my Caps Lock key? That is an awesome idea. It appears OSX only lets me turn it off not create a key chain?
What program did you use?
Hi Scott,
Brett Terpstra does a much better job of explaining it with his tutorial here: https://brettterpstra.com/2012/12/08/a-useful-caps-lock-key/
His post has instructions and links to all the utilities you need to pull this off, but if you have trouble with it let me know!
So, do you leave everything in nvALT? Or, do you clear it out and put it all in Evernote? If not, what is the distinction between the items you put in each?
This is where the friction is for myself. There are all these great tools and, like you describe, reach in the old tool box and yank one out. sometimes it is Evernote… sometimes it is something else. What ends up happening is there are things in multiple locations and it results in hell trying to find individual items.
How do you handle the the toolbox “overfloweth”?
Great question, Mike! I personally use nvALT as an inbox for information, which means it MUST be cleared out periodically. I don’t leave anything in there past my weekly review.
In my experience, the key is have a specific purpose for every tool in your toolbox. If there’s isn’t definition in the system, that’s where things can get confusing – you can’t keep some reference material in nvALT and the rest in Evernote, that defeats the purpose of GTD!
Personally, I use:
– nvALT/Drafts as my inbox (synced via Dropbox)
– Omnifocus as my task manager
– Evernote for reference material
Each of these has a very specific purpose, and I know exactly which container things belong in. I found that putting everything in writing (like this) really helped bring clarity to my entire system.
Hope that helps!
Great article. I’ve tasks in OmniFocus to look for these each Friday. A question on editing notes on iOS. Why use Notesy when Byword (which you use on the Mac) also has iOS apps? You can set Byword’s DropBox folder to the same folder you set for nvALT. What is the advantage of Notesy?
Hi David, thanks for reading! Awhile back it was because Notesy supported the updated TextExpander touch API and Byword didn’t, but that’s no longer the case as they now both support integration with TextExpander. I guess I’ve just gotten so used to Notesy on iOS that I keep using it because it’s familiar, but the latest Byword update added some really killer features (like publishing to the web from within the app) and is definitely a great iOS writing app. You’re correct that you can set up the Dropbox folder sync the same way in Byword for iOS, as well as a lot of other great writing apps (like Editorial).